Author Remy from Geektopia used a thermal camera in order to measure the heat output of the RasPi under several conditions(The full, translated article can be read here). In the Image below, it can be seen that there are three major heat sources: The SoC(center), the USB/Ethernet controller(right), and the voltage regulator(left).
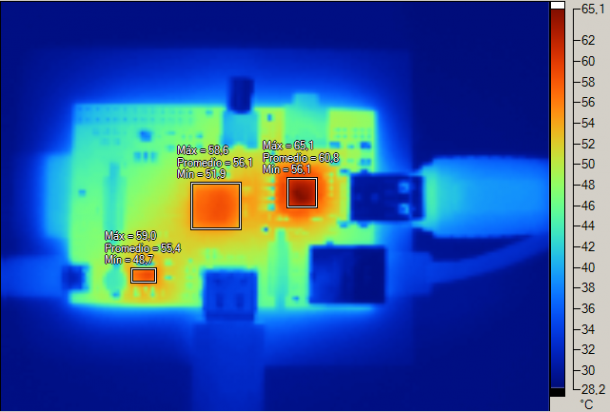 |
| Image Courtesy of Geektopia.es |
As you can see in this photo, the average temperature for the SoC while streaming video over network is about 56.1 degrees C. Not melting hot, but hot enough to cause some concern for me.
I went digging around in my parts shelves, and grabbed an old aluminum heatsink. I believe it was a chipset heatsink off an old Pentium IV based Dell box.
 |
| An old chipset heatsink seemed to be the perfect size |
Luckily, it happened to be just short enough that the overall height of the RasPi is about the same. Using a digital caliper, I measured the three chips I will be covering. The SoC is 12 x 12 mm, the USB/Ethernet chip is 8.6 x 8.6 mm, and the voltage regulator is 6.5 x 5.5 mm.
 |
| Digital caliper: one of the wisest investments I have ever made. |
Using this, I measured out on the heatsink for each chip, rounding up to the next closest fin. Using a band saw, each piece was cut, and sanded down to size.
 |
| Cut up with a band saw, and faced off with a bench grinder. |
After getting them down to the right size, I used some thermal compound to attach them to each of the chips.
 |
| Heatsinks attached with thermal compound. |
 |
| Not any taller than the USB ports. |
 |
| 38.8 Degrees Celcius! |
As seen above, the infrared thermometer shows a temperature of 38.8 degrees Celcius. That's a difference of 17.3 degrees from the average temperature during network video playback! That much improvement will go a long way towards overall system efficiency and stability. Further implementation can be done with a 5v low profile brushless fan that came from a dead netbook. The fan could be powered directly from the GPIO pins. If it is possible to read core temperature with the SoC, then it could even be possible to utilize the GPIO with the fan in order to have the fan be intelligently controlled based on the SoC temperature, all with a simple python script.
Hello,
ReplyDeletehow those heat sinks attached to board, do raspberry pi have holes to mount heat sink.
regards,
Sanjay
There are no holes to attach heat sinks.I used a very small amount of this stuff, which is made specifically for gluing heat sinks to heat sources, where screws and clamps are not an option: FrozenCPU: Artic Alumina Adhesive(Premium Ceramic Thermal Epoxy) - 5 Gram set (AATA-5G)
ReplyDeletemuch easier to just purchase some of these at your local Fry's or Microcenter:
ReplyDeletehttp://www.zalman.com/ENG/product/Product_Read.asp?idx=136
Good point. They would work great, and could possibly be even more effective. The way I picture it is with the old engineer's motto: "Cheap, Fast, Right. Pick any Two." I already had some heat sinks in spare parts storage, so I didn't have to pay a cent, and got to recycle a little. And of course, projects are always fun. Thanks for the input!
DeleteThanks for the ideas! My Pi will be wearing some blue anodized heatsinks asap.
ReplyDeleteHello Michael, I would like to attach some heat sinks to my Raspi aswell. However, I don't know the first thing about electronics. Would you say there is a high probability that I would damage my Raspi if I try to attach to it some of those Zalman heat sinks David Anders has linked?
ReplyDeleteGreat post! Only thing though I would note is the difference of temperature might not be as big as it actually is with your measuring technique.
ReplyDeleteMeasuring shiny metals with an infrared thermometer can give inaccurate readings. The shinny metals have a low emissivity (the temperature will read much lower then it really is). Try a black sharpie or putting some electrical tape on the heat sync.
Not sure if there is a way to access the die temp of the SOC, that probably be best..
Hi, will you make me one and send it to me in Edinburgh, I'll pay you thanks. I have heatsinks from old computers but I don't have a band saw.
ReplyDeleteOne thing I am wondering: Are all the parts that have to be cooled at the same height?
ReplyDeleteThank you for any information.
A nice set of 3 heatsinks is now available here:
ReplyDeletewww.etsy.com/shop/nhslzt
Very cool. Thanks for posting this. Would love to see a thermal image after the heatsink was installed.
ReplyDeleteThanks for this blog!!
ReplyDeleteyour blog is very informative.
DIY Raspberry Pi Aluminum Heat Sinks is superb Heat Sinks.
on my raspian wheezy build, i can do this to print out the cpu temp
ReplyDelete$ /opt/vc/bin/vcgencmd measure_temp
if we use a small brushless fan mounted on the cabinet, woudl it be enough to do away with the heatsink?
ReplyDeleteQuickly this site will indisputably be famous among all blogging people, because of its fastidious articles or reviews.wwom
ReplyDeleteNice one for offering this. Would want to consult a thermal image when the heatsink was installed. Keep it up! redcurrent
ReplyDeleteDIY an Aluminum Heatsink is interesting, thank you for sharing the information on your task. Such an Aluminum Heat Sink can be always custom made from this Heatsink Manufacturer.
ReplyDelete